How to Store Garden Tools for Winter
Pick a dry afternoon before the hard freeze, clean every tool, scrub off rust, sharpen and oil the blades, bring in the hoses and pots, and note where it all went.

On this page
- Do it in one afternoon, before the ground freezes
- Clean the soil off every tool
- Deal with rust while it's still small
- Sharpen every blade
- Oil the metal and the wooden handles
- Bring the hoses and pots in from the cold
- Battery and gas-powered tools
- Give every tool a place off the floor
- Write down where each tool went
- Where an app helps
- The short version
It's the first warm Saturday in April. The pruners are seized shut with a ring of rust where the blades meet, the hose split along a kink that froze in January, and two terracotta pots have cracked clean in half. The trowel is somewhere. Nobody knows where the loppers went, or whether the neighbor ever brought them back.
Storing garden tools for winter comes down to six jobs: cleaning off the soil, dealing with rust, putting an edge back on every blade, oiling metal and wood, getting the hoses and pots out of the cold, and writing down where it all went. None of it takes long. Here's how to do each, in the order that makes spring easiest.
Do it in one afternoon, before the ground freezes
The best time is the first dry afternoon after the last real yard work of the year, once the leaves are done and before the first hard freeze. Tools put away wet and dirty in October are the rusted ones in April, and a hose left connected to the spigot through a freeze can split, along with the fitting it's screwed into.
Gather every tool in one place first: the shed, the garage, the corner of the yard, the trunk of the car. You can't put away what's still leaning against the back fence, and gathering is how you notice what's missing while there's still time to ask around.
Clean the soil off every tool
Soil holds moisture against metal, and moisture is what rusts a shovel over a winter. Every tool gets cleaned first.
Knock off caked dirt with a stiff brush or a putty knife, including the inside of the shovel socket where the handle meets the blade.
Wash the metal with water and a brush. A little dish soap helps with sap on pruners and shears.
Dry every tool completely with an old towel, then leave it in the sun or a dry garage for an hour. Check hinges and springs, where water hides.
If a tool cut diseased plants this season, wipe the blades with rubbing alcohol before storing it, so it isn't carrying the problem into next year's beds.
Deal with rust while it's still small
Light surface rust comes off with steel wool or a wire brush and some effort. Scrub until you're back to bare metal, wipe the dust away, and move straight on to oiling so the bare patch doesn't rust again overnight.
Heavier rust on an old shovel or hoe is worth a soak. Many gardeners use white vinegar for this: leave the head in it overnight, then scrub, rinse, and dry it thoroughly. A tool that's pitted all the way through is a candidate for the replacement list rather than the rescue pile, and that's worth knowing now rather than on the first planting weekend.
Sharpen every blade
Winter is the easy time to sharpen, because no planting bed is waiting on the tool. Pruners, loppers, hedge shears, hoes and spades all work better with an edge, and a sharp pruner makes a clean cut that heals faster than a crushed one.
Use a file or a sharpening stone, follow the angle of the original bevel, and work on one side only for bypass pruners. Most pruners and loppers come apart with a single bolt, which makes them easier to clean and sharpen properly. If you take one apart, photograph it first and keep the small spring somewhere you'll find it.
Oil the metal and the wooden handles
Once a tool is clean, dry and sharp, give it a thin coat of oil:
Wipe metal blades and heads with a light machine oil or a rag dampened with vegetable oil, so moisture can't settle on the steel.
Put a drop of oil on every pivot, spring and hinge on pruners, loppers and shears, then open and close them a few times.
Sand rough or splintered wooden handles with medium sandpaper, then rub in boiled linseed oil and wipe off the excess.
Lay linseed-soaked rags flat outside to dry before you throw them away, because oily rags bunched in a pile can heat up on their own.
A bucket of sand with a little oil mixed in is an old trick for small hand tools. Push the trowel and the hand fork into it through the winter, and they stay oiled without another thought.
Bring the hoses and pots in from the cold
Hoses and pots are the garden gear most likely to be ruined by a freeze, and both are easy to save.
Disconnect every hose from the spigot, drain it fully by walking the length of it and holding it high, then coil it loosely without kinks.
Store hoses indoors or in a garage, flat or on a reel, rather than on a hook outside where they freeze stiff and crack.
Bring in spray nozzles, sprinklers and timers, which can crack when the water left inside them freezes.
Empty soil out of terracotta and ceramic pots, brush them clean, and store them somewhere dry. Clay holds water, and water expands when it freezes.
Stack pots upside down, with a sheet of cardboard between nested pots so they don't crack each other.
Plastic and resin pots handle cold better, but they still last longer stacked out of the sun.
Battery and gas-powered tools
String trimmers, hedge trimmers and leaf blowers each come with their own storage instructions, and the manual is the place to start. For gas tools, that usually means dealing with the fuel the way the manual describes, either running it dry or adding a stabilizer. The guide to storing a lawn mower for winter covers the same steps for the biggest tool in the garage.
For battery tools, many manufacturers recommend bringing the batteries indoors for the winter and storing them partly charged, away from the cold. Check yours, then keep the batteries and the charger together, on the same shelf.
Give every tool a place off the floor
Tools left on the floor stay damp and get stepped on, which is how handles crack and rakes lose tines. Long-handled tools hang on wall hooks or a rail, heads up. Hand tools go on a shelf, in a drawer, or in a labeled box with the tools inside it written on the outside. Chemicals like fertilizer stay sealed in their original containers, up off the floor and out of reach of children and pets, with any liquids kept wherever the label says they won't freeze.
The guides to organizing a shed and organizing a garage to park your car cover setting up those spaces so the rake isn't the first tool that falls on you in March.
Write down where each tool went
In April, the problem usually isn't rust. It's that the pruners are in the kitchen drawer, the hose nozzles are in a box in the basement, the battery is on a garage shelf, and the loppers are still next door. A short list fixes that. For each tool or group, note:
What it is, and how many (three trowels, eight terracotta pots)
Where it's stored: the room, and the shelf, cabinet or box
What needs replacing or repairing before spring
What you lent out, and to whom
That last line is the one people skip. The guide to keeping track of what you lend out covers the borrowed-loppers problem in more detail.
Where an app helps
A notebook does this job. If you'd rather the list carry photos and say exactly where each tool is stored, here's how it works in Cratify.
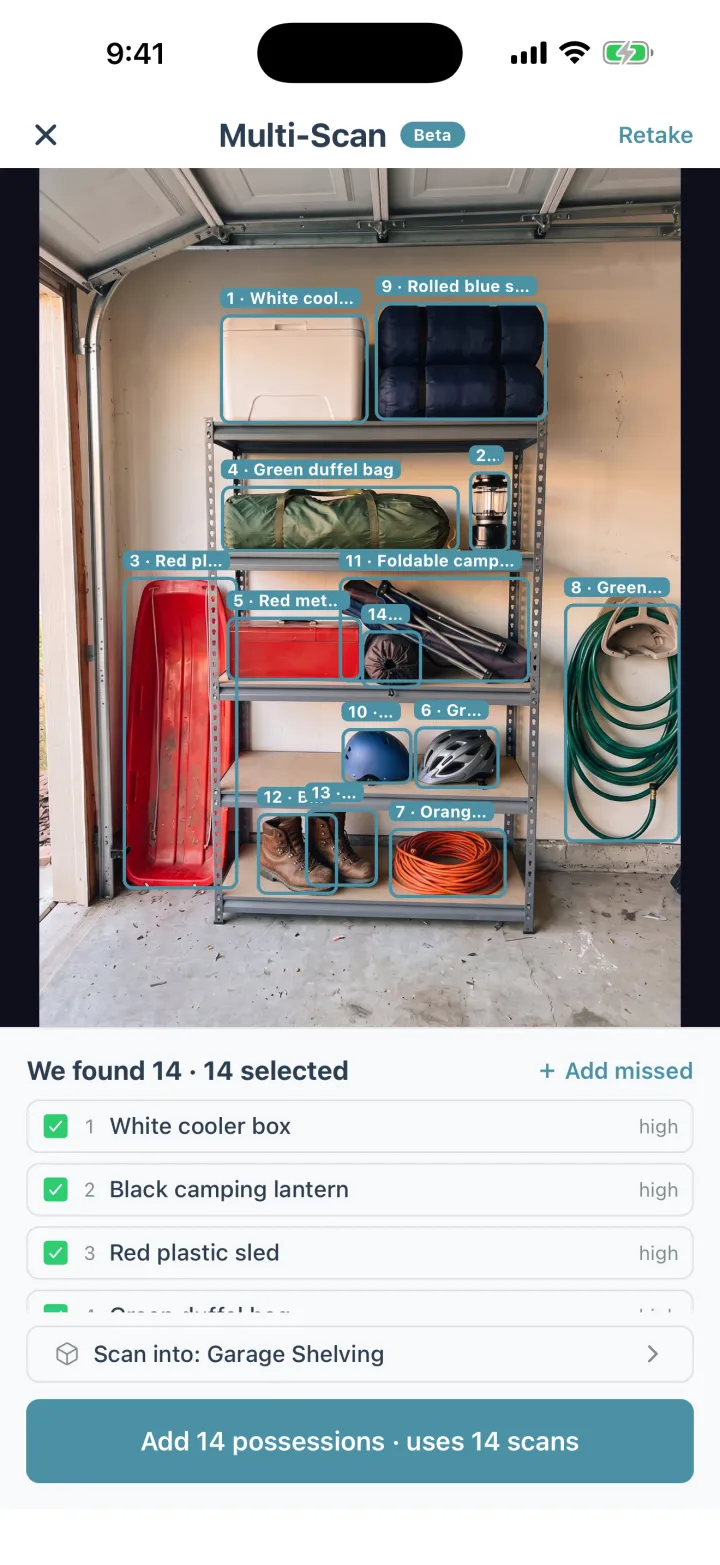
Multi-Scan names up to 15 possessions from one photo.
Each tool can be its own possession inside the container that holds it: the pruners on a garage shelf, the hose nozzles in a box in the basement, the batteries in a cabinet. Photograph a tool and AI identification fills in a name and category, with a confidence percentage on screen so you can correct either before you save. A quantity covers matching pieces, so eight terracotta pots show as ×8 instead of eight separate entries.
A Collection is a list that spans every container, with a check-off on each entry. Make one for spring garden setup and check tools off as they come back out, wherever they spent the winter. Search draws on each possession's details and the container it's in, so searching for the loppers tells you which shelf to check.
The short version
Pick a dry afternoon before the first hard freeze, gather every tool in one place, and clean the soil off each one. Scrub off rust, sharpen every blade, and oil the metal and the wooden handles. Drain and bring in the hoses, empty the clay pots, and hang the long tools off the floor. Then write down where each tool went, so the first spring Saturday goes to the garden instead of the search. Cratify is free to try.
Know where every garden tool spent the winter
Photograph each tool, file it in the container where it's stored, and check it off as it comes back out in spring. Cratify is free to try.