How to Organize a Fabric Stash You Can Actually Sew From
Measure every piece as you pull it out, sort by what you'll sew before color, fold to one width, store it away from sun and damp, and check a stash list before every sale.

On this page
It's the Friday after Thanksgiving, the fabric sale is on, and you're at the cutting counter with a bolt of red plaid flannel, trying to remember whether you already own two yards of it. You might. There's a stack on the closet shelf, a shopping bag of fat quarters under the cutting table, and a pile of pieces from last winter's quilt that never got folded. You buy it anyway, and at home you find the same plaid, folded in the closet with the receipt still tucked inside.
A fabric stash grows a yard at a time, mostly on sale, and it outgrows memory long before it outgrows the closet. Organizing it isn't about matching shelves. It's about knowing what you have, how much of it, and where it is, so you can start a project from the stash instead of from the store. Here's how to do it over a weekend.
Pull it all out and measure as you go
Before you buy shelving or boxes, bring every piece of fabric into one room. Check:
The closet shelves and the cutting table.
Shopping bags from sales you never unpacked.
Project boxes for quilts and garments you started and set aside.
Under the bed, the guest room closet and the top of the wardrobe.
The drawer of scraps you were saving for a small project.
As each piece comes out, measure it. Write the yardage and the width on a sticky note and pin it to the fold. Note whether it has been prewashed, too, because that's the question you'll have later and the fabric can't answer it. Ten seconds per piece now saves unfolding the whole stack every time you start a project.
Sort by what you'll sew, then by color
Color is the obvious way to sort, and it's the second step, not the first. A blue flannel and a blue knit don't do the same job, so sort by the kind of project each fabric is for:
Quilting cottons.
Flannel.
Knits for T-shirts, leggings and pajamas.
Apparel wovens like linen, denim and twill.
Wool, silk, fleece and other specialty fabrics.
Then sort each group by color, with prints next to the solid closest to them. If one group turns out much bigger than the others, that's worth knowing before the next sale.
Be honest about the pieces you'll never use: the color you bought for a project you've given up on, or a knit that pilled after one wash. A school, a theater group or a quilting guild may take them, and the guide to where to donate household items covers other places that will.
Fold everything to one size
Folding every piece to the same width is what turns a pile into a shelf you can read. Pick one width that fits your shelf depth and use it for all of it.
Yardage
Fold each piece of yardage selvage to selvage, then wrap it around a stiff board, like a comic book backing board, so it stands upright. Stand the pieces on the shelf like books, fold facing out, so you can see every one without pulling the stack apart. Keep the yardage note on the board.
Fat quarters and precuts
Fat quarters are small enough to fold or roll into a shallow drawer, sorted by color. Keep precut bundles in their ties until you plan to use them, because a loose bundle turns back into scraps.
Scraps
Scraps are where a stash goes to hide. Sort them by size as they come off the cutting table: long strips in one container, squares in another, small pieces in a third. Many quilters cut scraps to standard sizes, like 2 1/2-inch strips and 5-inch squares, so they're ready for the next quilt.
Set a limit, too. When the scrap container is full, sew from it or pass some on before adding more.
Store it where it won't fade or mildew
Fabric has three enemies in storage: light, damp and moths.
Light fades fabric along the fold, and you won't notice until you unfold a piece and find a pale stripe. Keep the stash out of direct sun, behind a cabinet door or on shelves away from the window.
Damp brings mildew and a musty smell. Avoid basements and attics that swing between hot and cold, and don't keep fabric in sealed plastic bags for the long term, because they trap moisture. Closed cabinets, fabric boxes or cotton pillowcases let it breathe.
Moths and carpet beetles go for wool and silk. Keep those pieces clean and in closed boxes, and check on them when the seasons change.
Once a year, refold the pieces that haven't moved, so the creases don't set into permanent lines.
Give each project its own box
A project that lives half in the stash and half on the cutting table is the one that never gets finished. When you choose a project, build it a kit:
Pick the pattern and note the yardage it calls for.
Pull the fabric from the stash and check it against the pattern before you cut.
Add the thread, zipper, buttons and interfacing the pattern lists.
Label the box with the project name and the date you started.
When the project is done, return the leftovers to the stash with a new yardage note.
The guide to organizing a craft room covers where project boxes live when the room holds other crafts too.
Keep a stash list before the sales start
The last step is the one that saves money. Keep a list of what you have, with one line per piece:
Fabric type and color.
Yardage and width.
Prewashed or not.
Where it is: which shelf, drawer or project box.
Check the list before the holiday sales and before you buy for a gift project. It answers the question at the cutting counter: you already have the plaid, two yards of it, on the second shelf. If you knit or crochet as well, the guide to organizing a yarn stash uses the same kind of list for yarn.
Update the list when fabric comes in or a project uses it up. A list that's a season out of date leads you straight back to buying duplicates.
Where an app helps
If you'd rather keep that list on your phone so you can check it at the fabric store, here's how it works in Cratify. The sewing room is a Room, and the storage in it is containers: a Shelf, a Drawer, a Cabinet. A project box is a Box, and containers can sit inside other containers, so a Shelf's view lists the possessions on it and in every Box on it, with totals.
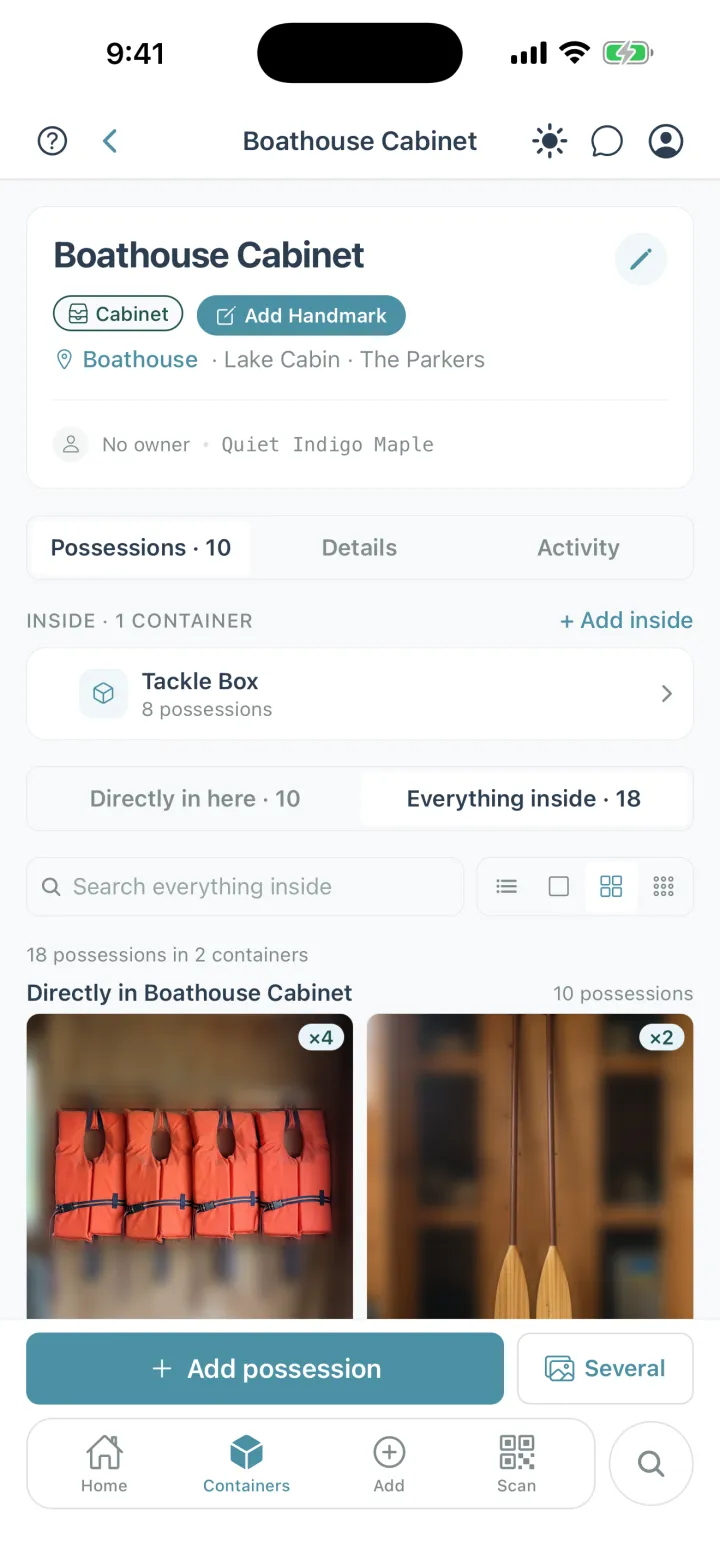
Containers inside containers, with everything inside listed.
Each piece of fabric can be an Item possession with its photo. Photograph it, and AI identification suggests a name and category, with a confidence percentage on screen, so you can rename it to what you'd search for, like red plaid flannel, 2 yards, before you save. Categories and tags are yours to set, so a Quilting cotton category and a prewashed tag can work the way your stash does, and identification prefers the categories and tags you already use. A stack of matching fat quarters can be one possession with a quantity instead of six separate entries.
Search draws on each possession's details and the container it's in, so searching for plaid at the cutting counter tells you which Shelf it's on. A Collection is a list that spans containers, with a check-off on each entry, so the fabrics for a holiday quilt can be one Collection, checked off as you pull each piece from its shelf.
The short version
Pull every piece of fabric into one room and note its yardage as you go. Sort by the kind of project first and color second, fold everything to one width, and sort scraps by size. Store it out of sun and damp, keep wool and silk closed up, and give each project its own box. Keep a stash list and check it before every sale. Cratify is free to try.
Know what's in the stash at the fabric store
Photograph each piece of fabric, name it with its yardage, and search your stash from the cutting counter. Cratify is free to try.